
The Weber Grill Center: The Assembly

Part 1 of a 2 part series...
In my world, welcoming a new grill to the back deck is like welcoming a new member of the family. There is pomp, circumstance, a couple beers, and a ton of pictures.
Some may call it a party. I call it an unboxing.
In fact, the unboxing of my Weber Summit 650 back in 2007 changed the course of Another Pint Please from "My Internet place to talk about beer and travel" to "My Internet place to talk about beer and grilling". The 650 unboxing was a seminal event. I just thought it was cool to take pictures of Weber's newest Summit redesign from arrival in my backyard to first light. I had no idea my box hugging picture of joy would later appear on the homepage of Weber grills. Better still, I had unknowingly embarked on a five year hobby of taking pictures and writing about what I grilled for dinner, lunch, and yes, sometimes breakfast.
I've followed the same ritual with the unboxing of my 26.75 inch Weber kettle, my Dad's Summit 670, and to a lesser extent, because of an ant attack, my brother's Spirit. The former with pride, the latter with a little bit of envy.
It has been a couple years since I have unboxed anything. So needless to say, i was pretty excited when this showed up:

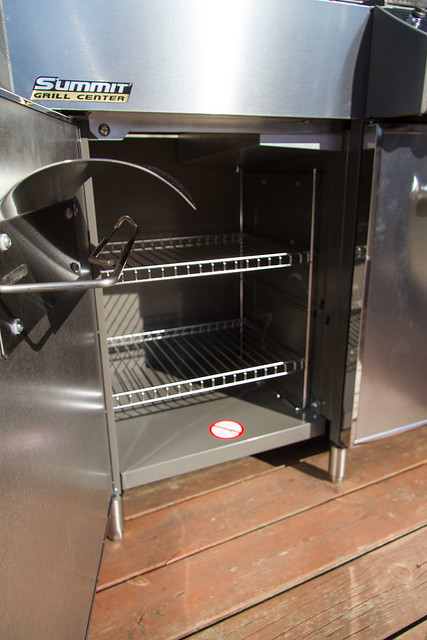
Meet The Weber Grill Center. Over the last year, Weber added what I call a "lifestyle addition" to their Summit 670 grill. By adding additional storage and work space, the grill turned from place to "make dinner" to place to "prep dinner, hang out, and make dinner." I've had my eye on it for a while. It is simply beautiful.
As I thought back to my previous Summit assemblies, I knew additional help was needed and in this case, I was happy to have Greg, a Dayton-based Weber rep, to help out. Summit grills arrive mostly assembled. However, the grill center had lots of extra pieces. Two hands were a must.
The main carton contained the grill.

Every bit of storage space was maximized with parts.
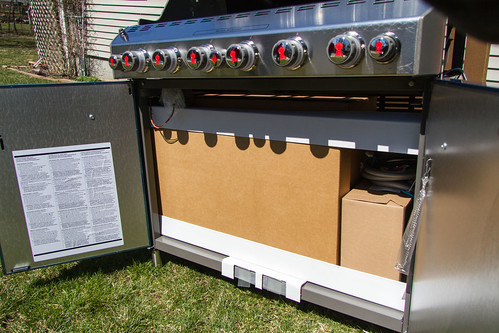
Although I'm one to sometimes shun them, the instruction manual was a must.

Especially the part that identifies certain functions as needing two people.

There were several times I stopped and marveled at the "newness" of the grill. The burners, for instance:

While I've never had a problem with mine on the 650, there is just something damn sexy about all of that shiny stainless steel.

When I put together Dad's 670, I paid more attention to the obvious new features versus the more obscure. One of the first things I noticed was the metal ridge covering the rear of the IR rotisserie burner.

An issue reported by early 650 owners involved water collecting in the drip pan after the grill was left in the rain. Although I found it pretty easy to you know, cover the grill, it appears this was solved on the 670 by adding a strip of metal across the divide. The picture above is the Grill Center. The picture below is the 650:

Also I noticed a strip of angled steel underneath the front edge of the hood. The 650 doesn't have it.

It provides a nice seal across the front of the grill, also preventing any water from going behind the knob assemblies.

I like labels with character…and greetings!
As we added in the grates and smoker box to the grill, I again took stock of just how nice everything looked when it was shiny new.


I like to keep a clean grill, but there is really nothing like a grill right out of the box.

The most labor-intensive part of the installation was the side tables.

The side tables arrive totally unassembled, but with help, are a fairly straight forward install.

All of the sides were held together by bolts and screw clips.

I mentioned earlier about this being a two-person install. The side table assembly is where the extra pair of hands helps.

One of the Summit redesign features I loved on the 650 was the lack of what I called "lawnmower wheels." Well, on the grill center, wheels aren't even an option. It has feet. It's permanent. I'm not moving it….except of course to stain the deck next weekend. Nice timing on my part.

One other time consuming part of the install is removing the stainless steel protective wrap.

In order to protect the stainless as much as possible, I left it on until I absolutely had to remove it.

While the left side table houses shelves and a workspace on top, it also has one of the greatest outdoor tools ever: a paper towel holder.
Yes, this there is a glimmering bit of hope I might ruin one less shirt this year thanks to a well-placed roll of paper towels.
While you may feel it hard to outdo the paper towel holder, the right side does hold something a little more grand: a double ring side burner.

One of my biggest disappointments with the 650's side burner was the lack of temperature control. I always felt it was hot and hotter. I could never really simmer with low heat. Everything boiled. It was great for reducing a liquid, except when you didn't want to.
I don't think that will be a problem any more.

The burner arrives assembled minus the gas line connection.

It's a quick disconnect, so it takes only a second to hook the gas line in.
The lid on the burner can either rotate towards the back:
Or, it can be removed:

This is pretty damn cool.

My side burner lid on the 650 is to put it mildly, a mess. I use the side burner a lot and have always found it difficult to keep clean. I no longer have that concern and better yet, when the lid is in place and closed on the grill center, I have a ton of worktable space to use.
I almost forgot about a feature. The left side also holds the hideaway rotisserie motor.

I love to rotisserie. I hate having to drag all of the rotisserie parts out of various reaches of the home. I'm really looking forward to the convenience.

With the motor firmly housed on its trap door, the spit is secured to the back of the grill.

The forks are held on the trip tray support in the main cabinet.

Wait, one of the rotisserie forks is not like the other. Did a part not get shipped? No, the spit screw was there for a few seconds...until I dropped it under the deck. That is so my style. Nonetheless the forks have a great out of the way spot when not in use.

Outside of being nice and new, the knobs on the grill center appear to have more of a range than the 650.

They also light up.

After about an hour the grill was assembled. The last step was to connect the natural gas line and soap the joints.

With everything done, I stepped back to admire the sight.
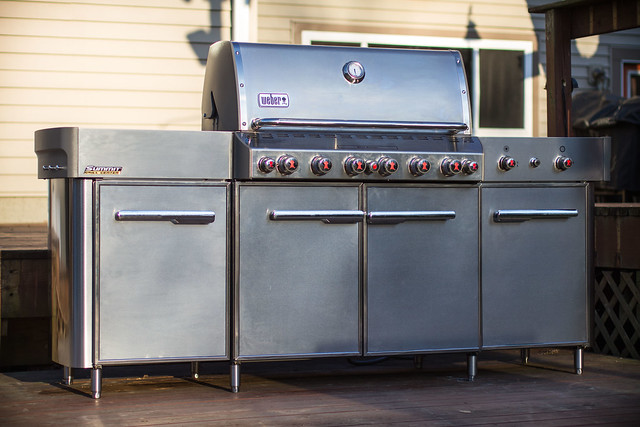
Size wise, I rolled the 650 in front of the Grill Center to get an idea of the size difference.

The tables are the only real difference and this picture doesn't really do it justice.
There is one thing I need to be careful about: the doors.

I love all of the storage space, but I need to keep my ADD in check and not open multiple doors at the same time. Disaster will strike.
As the afternoon wound down, I don't think I was the only one experiencing emotions. While I was feeling quite giddy, a good friend of mine had a down look in his eyes.

Sorry little buddy. It's been a good ride and you still have a lot of life left in you. Your new home will be full of lots of love.
The experience of putting together a new grill as beautiful as the Grill Center is a memorable event, which is why I took hundreds of photos. I wanted to remember everything about day one for no matter how well I take care of the grill center, it will never look the same.
Speaking of care, the cover works really well. I'm sort of glad it's not the "big top" cover for the 650, as over time that one became difficult to handle, especially in the wind. The Grill Center cover protects everything from the top of the doors up.
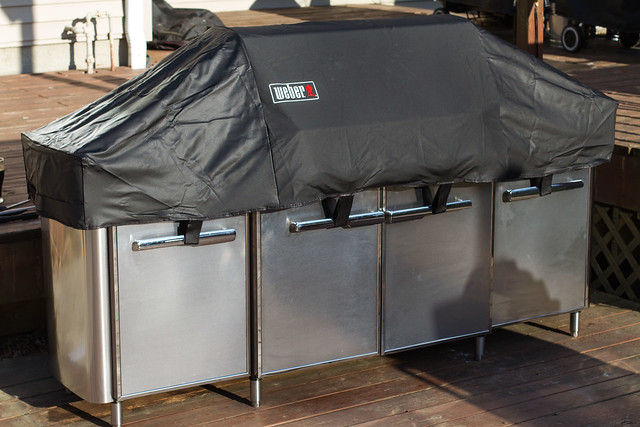
It is secured in the front with velcro straps.

And in the back by hooks.

It's simple and straightforward. I like it.
With the assembly complete, it's time for a few more pictures and then, the first light...


Part Two: The Weber Grill Center: First Light
On to Part 2: Operation
NOTE: The Weber Grill Center was provided to me by the outstanding people at Weber. Why? We did something cool together.