
Rotisserie Standing Rib Roast: What's on the Grill #311
When entertaining for the holidays, nothing beats a standing rib roast, or what it is more commonly know as: Prime Rib. On my lists of “Meats I love,” it is at the top and for good reason.
Thanks in large part to the fat content, this is one of the most succulent pieces of meat I grill. While the fat in a grilled ribeye contributes greatly to the flavor, the same fat in a rib roast, literally I might add, has not minutes, but hours to render. The slow roasted results are mind numbing out of this world.
For entertaining, a rib roast works as it is easily scalable depending on how many are coming over for dinner. Whether grilling for 4 or 12, it will make the perfect centerpiece for your holiday table. It is just a matter of bones.
I’ve grilled rib roasts before, but mostly on the grill, indirect. I’ve also grilled boneless rib roasts on the Summit’s rotisserie. What I have not done, is grill a rib roast with the kettle’s rotisserie. Well, not until now.
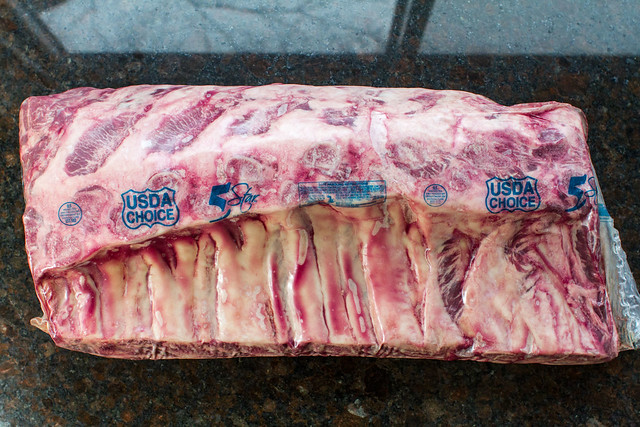
For Christmas this year, we had the fortune to entertain my family. I wanted something different and big, so we went all in with a 7 bone - 20 pound standing rib roast. It was massive and better yet, a Christmas gift from Mom and Dad. My kind of stocking stuffer.
Speaking of prime rib, as I wrote last year:
While the word "prime" tends to immediately evoke the grade of cut (prime, choice, select, etc), in this case, prime rib refers to the type of cut. Prime rib is one of the 8 primal cuts of meat. These primal cuts are the sections first removed during the butchering of an animal's carcass.
So, even though I picked up a two bone standing rib roast graded as choice, the USDA says I can still call it prime rib, even though it's not USDA Prime.
In the end call it what you want. I will call it awesome.
So true. While I could have paid more for prime grade, I opted for choice. I’ve found that for longer cooks, such as a roast this size, choice works just as well.
Enough talk, let’s get to it.
Rotisserie Standing Rib Roast
by Another Pint Please
Feeds: An Army
Standing Rib Roast, 7 bones - 20 pounds (scale recipe down for smaller cuts)
1/4 cup fresh rosemary, chopped
1/4 cup fresh thyme, chopped
5 cloves of garlic, chopped
3 T kosher salt
3 T freshly ground multi-colored peppercorns
olive oil
butcher twine
Here is the roast.
Here is me loving the roast.

Here is me dancing with the roast.
A photo posted by Mike Lang (@anotherpintplease) onDec 12, 2014 at 4:32pm PST
I digress.
I get my meat directly from my local purveyor, so it came cryopacked. I debated how much butchering my meat needed. For awhile I toyed with Frenching the rack but decided against it. While I wanted to remove some extra fat, I decided against trying to remove the chine bones. Standing rib roasts can also be purchased “boned & tied.” The bones are removed and then re-tied to the roast. Carving after the cook is easier, and the final flavor is said to be indistinguishable from an intact roast.
In order to make a decision before the meat hit the grill, I needed to know where I was going after, and the short answer was stock. Since I knew I wanted to make stock with the remaining bones and meat, Frenching was an afterthought and any additional trimming, absent excessive fat, was eliminated. I wanted to grill as much “meat” as possible.
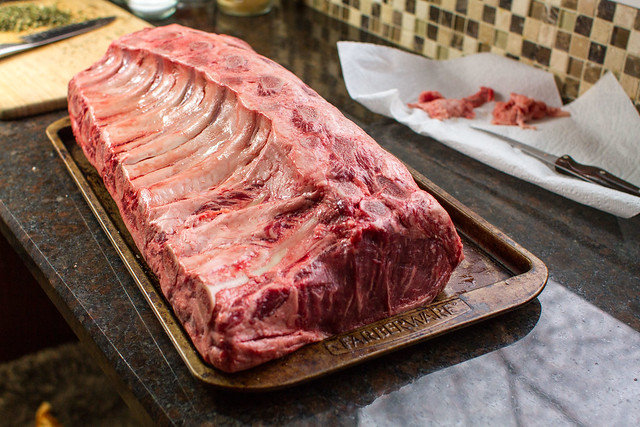
1. Remove any excessive fat from the meat.

Lightly rub with olive oil and cover completely with the herbs, garlic, salt, and pepper.

For seasoning, I like to go fresh and minimal. In this case, fresh herbs, like rosemary and thyme, and garlic…lots of garlic.
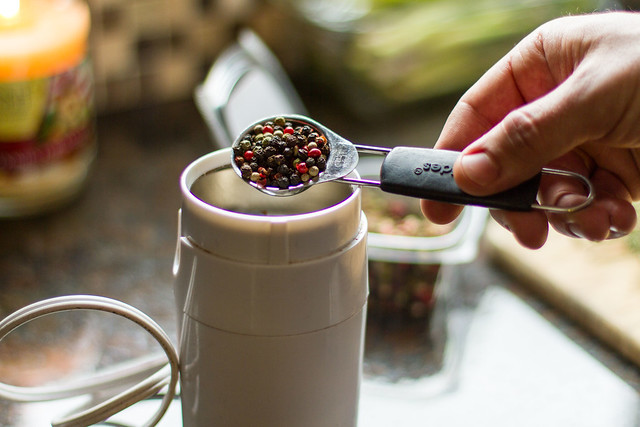
Also, for the pepper, a special roast requires a special blend: multi-colored peppercorns. Buy the whole and use a coffee grinder, which in my case is dedicated to spice, to coarsely grind.

2. Prep the grill for indirect medium heat, with the coals only on one side of the grill and a drip pan in the center.
3. Truss every bone with butcher twine.

Trussing is especially important with a rib roast, especially on the rotisserie. The roast needs to stay compact and together. Trussing makes it happen.
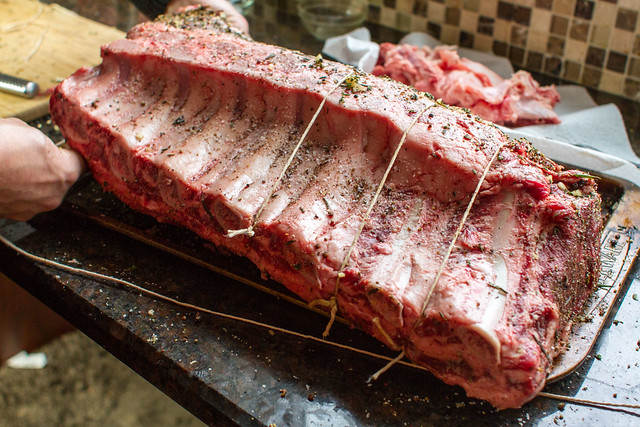
I certainly accept the fact I have half-assed my trussing through the years, but I think I have finally perfected the butcher knot.
This video, at 15 minutes in, lays it out.

4. Ready the spit.

The ratio of muscle to bone changes as the roast goes from the shoulder to the leg, so in order to balance the spit, insert the rod at an angle to account for the variation.


The cook process is a variation of the reverse sear: a slow roast rising of the meat’s internal temperature of the meat finished off with a high-temperature sear.
While the fantastic J. Kenji López-Alt uses an oven, and a slightly lower roast temperature, I felt it was an easy process to replicate on the grill. I do the same thing with thick cut steaks all the time. The kettle temperature should be around 300 F. Gate the top vent down if the temperature is too high.
5. Place the spit on the grill and turn on the rotisserie.

This is huge roast, which hung over the coals more than I preferred.

To prevent any issues with fat flaring up on the hot coals, I draped a piece of heavy duty aluminum foil over the coals directly under the meat and into the drip pan.

The foil protected the meat from flare-ups
6. Close the lid and keep it closed.
Grill the roast until the internal temperature is 120 F. For this size roast, figure about 3 hours or about 9-10 mins a pound. Figure on adding about 8-10 unlit coals of charcoal halfway through the cook.
7. 15 minutes before the end of the cook, light a chimney full of charcoal. For an extra surge of heat, use lumpwood instead of briquettes.
8. With the roast at 120 F, add the lit chimney of coals to the side of the grill without charcoal. Close the lid and make sure all of the vents are open.

The temperature of the grill should rise to over 400 F. 500 F would be ideal.
Note: Be careful dumping lit coals into the grill. In other words, do as I say, not as I do. I started to add coals to the lit side, but a few slid down the foil not the trip pan where the fat promptly caught fire. While the fire certain helped my sear, it wasn’t ideal. For best results, and not a fire display, add the grill to the empty side of the grill.
9. Continue to grill another 10-15 minutes, or until the internal temperature of the meat reaches 125 F.
10. Remove from the grill, loosely tent with foil, and allow to rest.
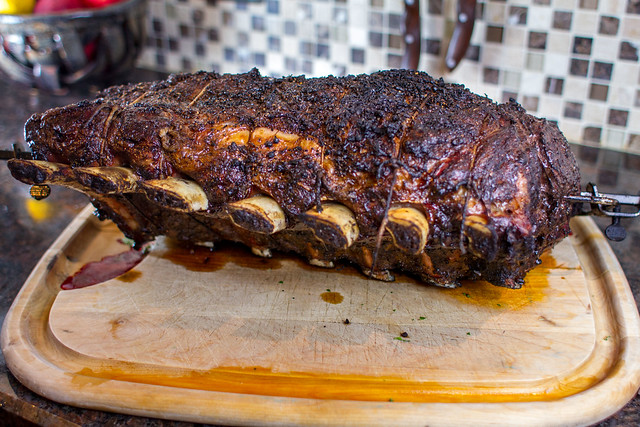
11. Remove the hot spit from the roast.

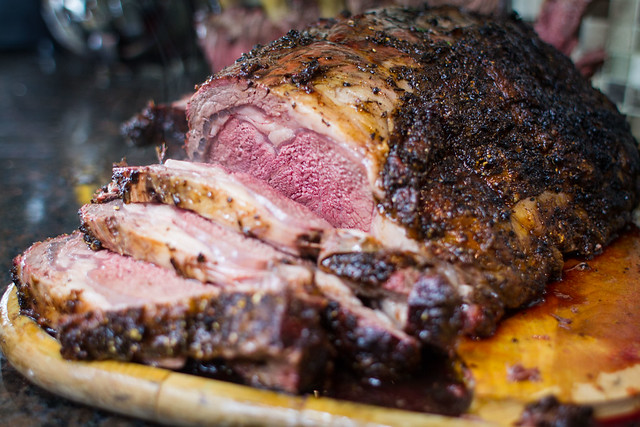
Carve and serve.
Leaving the bones attached to the roast is awesome until this step, as they create difficulty when carving. While I know a few of us will gnaw on the bones, most I am saving for stock, so I am less worried about presentation at this point. To simplify carving, remove all of the bones from the roast by following their contour with a sharp knife.

Once separated, carve the remaining roast.

I was a little worried putting something so big and expensive on the grill.

In fact at first, I was afraid it was not even going to fit. Thankfully, all of my fretting was for nothing.

This was easily the best piece of beef I have grilled in a long time and to know it was the centerpiece of our family’s Christmas celebration made it that much more awesome.

Whether grilling 2 bones or 7, grab your rotisserie and give it a shot. The results, and most importantly, the flavor, are worthy of any holiday celebration.
