
I like big butts.

I can't deny....I like big butts...Boston butts that is. When I think of summer, I always think of spending a day grilling a pork shoulder, aka a Boston butt. Although possible to grill year round (which I have), it is much more fun to do a shoulder when the weather cooperates. Although it may take a long time to grill a shoulder, how else can you easily feed 10 people for fifteen dollars?
As I continue to document my grilling exploits, I have realized the one thing I really need to improve is my note taking. I figure this is the best place as any to do it, so let's get started.
My process involves grilling a shoulder on a Weber Kettle. Although this is my preferred method, there are many others way to do it: a gas grill, a smoker, or even your oven. A cook can take all day, so plan ahead. I look at it as something to look forward to. Ask my wife, I was giddy all day in preparation!
I picked up a 7 pound Boston Butt from Sam's and then made a rub:
2 Tbls Dark Brown Sugar
2 Tbls Sweet Paprika
1 Tsp Cumin
1 Tsp Garlic
1 Tsp Freshly Ground Pepper
1 Tsp Sea Salt
1/2 Tsp Ground Mustard
1/8 Tsp Celery Seed
1/2 Tsp Ancho Chili Powder
Rubs are like relatives, everyone has one. I threw this together recently, and it is still a work in progress. Use less, use more, use just salt & pepper...but use something.
With my butt resting at room temperature (for at least 30 minutes) and rubbed, it was time to set up the kettle. Awhile back, I made a modification for my kettle that involved cutting off one side of the grate to ease the process of adding coals or wood while cooking indirect. I have come to prefer my grate versus the hinged grates that come with most 22 1/2 Weber Kettles. The hinges are fidgety and when I open the kettle to drop something in, I want to be out fast. The cook takes long enough, I don't want to add to it.
A 7 pound pork shoulder is going to take around 8 hours. Since the key to cooking is "low and slow", I know the shoulder will be cooked at a low temperature, approximately 250 degrees, and until the internal temperature of the pork reaches 190 degrees. In order to keep the kettle temperature low, I am lighting my charcoal using a process known as the Minion Method. Although used primarily for the Weber Smokey Mountain Cooker, a modified minion method works great in a kettle too (Thanks to Dustin for turning me on to it!). The minion method has you place lit coals on top of unlit coals. The unlit coals slowly heat up as the lit coals push their heat "down" the stack. By using this process, I do not have to open the kettle lid every hour or so to add new, freshly lit, coals to keep the heat going. It works great.

I started off by placing approximately 90 unlit charcoal briquettes (I actually counted these out! I'm documenting!) on one side of the kettle (I used good old Kingsford charcoal. Lumpwood charcoal is great for direct kettle cooking, but the briquettes used here will hold their heat longer). Using my charcoal chimney, I lit 30 charcoal briquettes.

Next to the unlit charcoal in the kettle, I placed a drip pan that I lined with aluminum foil and filled with a little bit of water (I didn't measure that...sorry). The water helps anything dripping off of the butt not to burn. On top of the unlit coals, I sprinkled a little bit of cherry wood chips that I had already soaked in water for an hour. I typically use apple or cherry wood chips when smoking. I have found their sweet flavor never really overpowers the meat, unlike mesquite...or a lot of hickory.
Since I was documenting this event, I decided to take a number of different temperature readings. In the past, I have almost always relied on the hood temperature. This time, I monitored not only the hood temp, but the ambient temperature outside the pork and the internal pork temperature. I will post those results later.

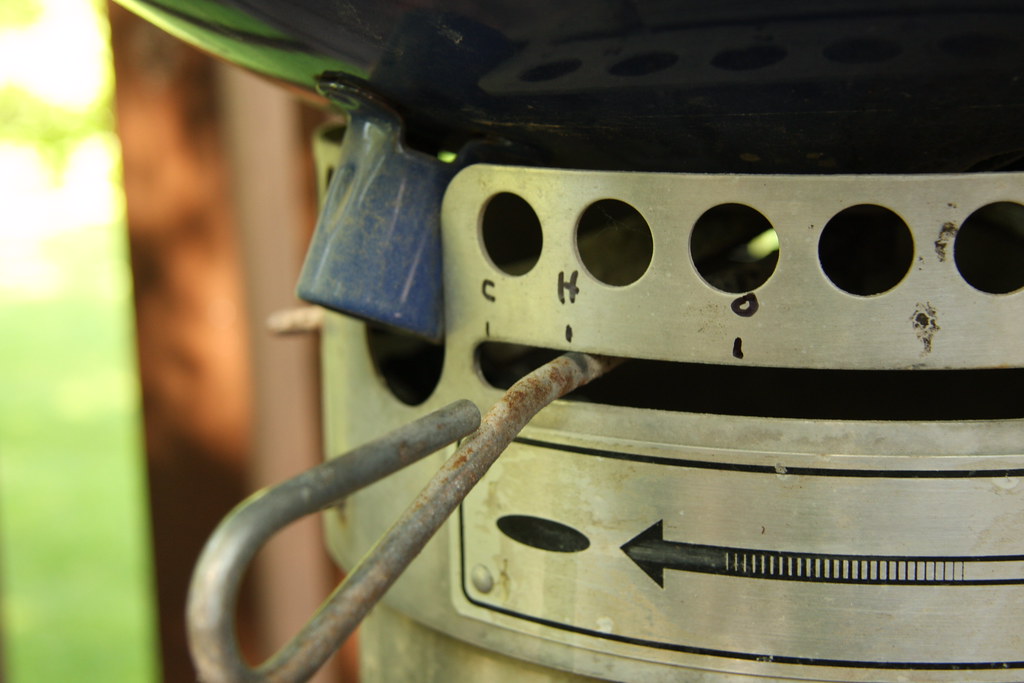
I placed the modified grate in place and oiled it down. Next, I tipped the lit coals on top of the unlit coals and followed that by dropping a handful of soaked cherry wood chips on to the pile. Now the key to regulating temperature control on the kettle is with the upper and lower vents. Starting out, I had the top vent open and the bottom vent only half open. In order to make things less confusing, I used a Sharpie to document where the open, half open and closed spots are (Thanks to Uncle Bob over at BBQ Source Forums for this great idea!). So, with the lid closed, I waited for the kettle temp to rise to 250 degrees. Once it did, I closed the bottom vent and placed the shoulder on the grate, over the drip pan. I then closed the lid and watched.
As I mentioned before, I typically used the hood thermometer to ballpark my target temp. This time, I used a digital thermometer to monitor everything. It was a lot easier just ballparking the hood temp. With a digital gauge I found myself constantly tweaking the top vent to maintain my temperature. Although it only swung no more than 10 degrees over or under 250, that accurate measurement drove me nuts. So, the day went on and I continued to document my thermal progress. I only opened the lid once around the 2 hour mark to toss in another handful of wood chips. Here are my findings:

Although I can pull the shoulder off the grill 5 hours into the cook, for the maximum pulled pork enjoyment of all that wonderful rendered fat, you need to take it all the way to 190. So, after enjoying a few good beers (which is also mandatory), the shoulder came off a little bit over 8 hours after starting. I checked the temperature again with an instant read thermometer and voila, I was set.
You can always tell you have grilled a successful shoulder when you are able to easily remove all of the meat in minutes and then leave behind...the shoulder!

For sauce, you can go north or south. In my case, I went both ways. I used a homemade ketchup based sauce from a few weeks ago. I have no clue as to what went into it. For a vinegar sauce, I used the surefire Hot Pepper Vinegar recipe from the Weber "Red Book".

Well that's how I do it. I'm not a Chef and the process certainly isn't perfect (well at least the beer drinking part is), but it works and most importantly, I have started writing down what I do besides just taking picture.